Why Ranthambore Is The Best Place In India For Tiger Photography
Ranthambore National Park in Rajasthan is one of the easiest places in India to photograph wild tigers. The forest is open, visibility is clear, and the landscape gives you natural frames lakes, fort walls, grasslands, and ruins.
But here’s a myth you need to drop if you want better photos (and better sightings):
Myth: “The best Ranthambore zone is the one with the most tiger sightings.”
Truth: The best Ranthambore zone for tiger photography is the one where you can shoot clean frames—good light, good background, and enough time to compose.
Chasing only sightings can also create crowding. A recent viral incident showed a tiger surrounded by multiple safari vehicles—exactly the kind of pressure that ruins wildlife behavior and your photography ethics.
Also note: Ranthambore has implemented restrictions like mobile phone usage bans in core tourism zones to reduce disturbance. So plan your photography workflow before you enter the park.
If you want sharp, story-rich tiger photos, use this guide to pick the best tiger photography spots in Ranthambore, understand light direction, and carry the right lens.

Before You Enter: The 30-Second Ranthambore Tiger Photography Plan
Do these three things before the safari starts:
- Decide your “story frame”: tiger + water / tiger + ruins / tiger + rocks
- Lock quick settings (start here): 1/800+, f/4–f/5.6, Auto ISO up to 3200
- Choose lens based on distance (don’t keep swapping—dust is real)
If you want a printable checklist, comment “TIGER” and we’ll send you a free PDF shot list (or email to [email protected]).
Best Ranthambore Safari Zones for Tiger Photography
Ranthambore is divided into safari zones (commonly described as Zones 1–10).
Each zone has different habitat, light direction, and background. Instead of rushing, learn how light and landscape change through the safari.
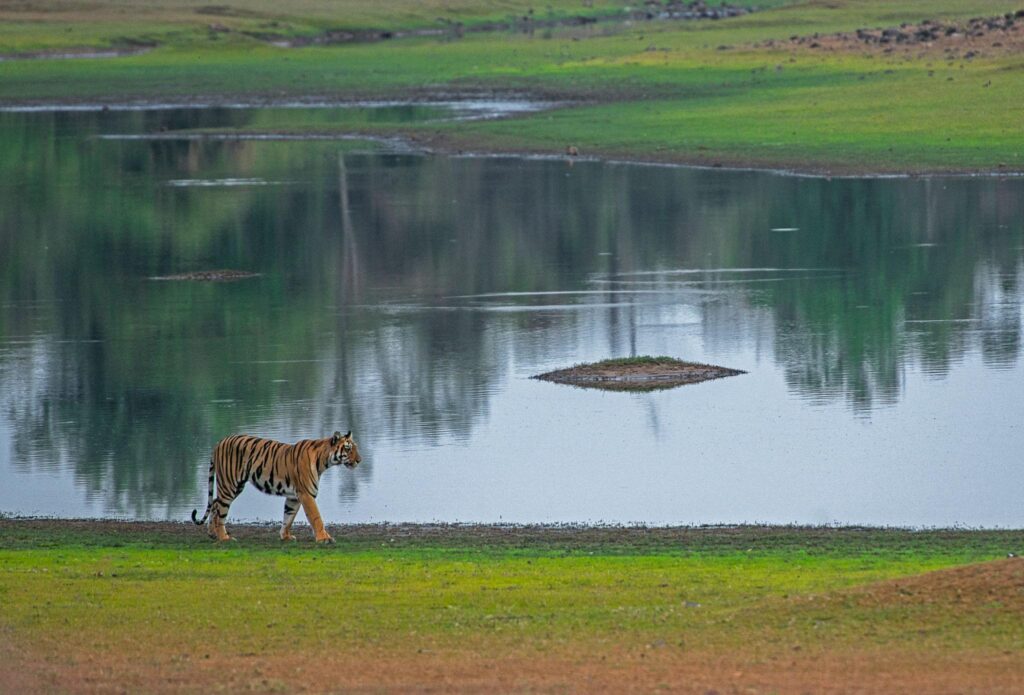
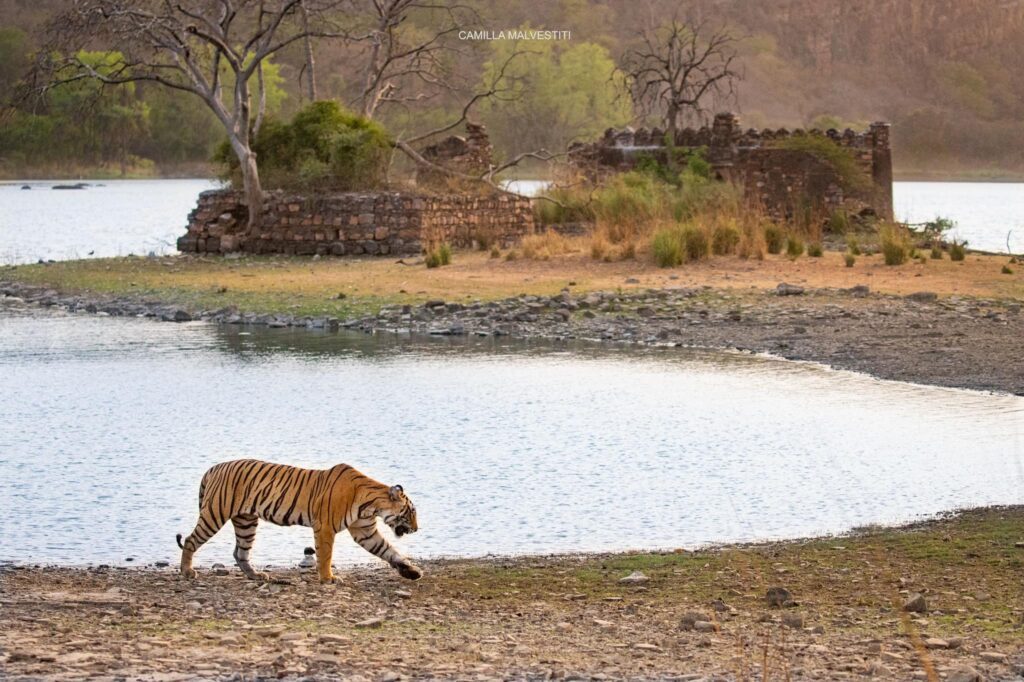
Zone 3 Ranthambore Tiger Photography: Padam Lake, Rajbagh Lake + Ruins
Zone 3 is the answer to the most searched question:
“Which is the best tiger sighting zone in Ranthambore for photography?”
Padam Lake and Rajbagh Lake give you wide, open views. That means:
- Clean backgrounds
- Tigers walking near water
- Reflection chances
- Foreground blur from grass
- Storytelling frames with ruins behind
The ruins near Rajbagh create that “royal jungle” look that Ranthambore is famous for.
How to shoot Zone 3 like a pro (without over-zooming)
During morning safari, golden light often falls beautifully on the lake edge. When a tiger walks the shoreline, the light hits the face and fur naturally.
Don’t zoom too tight.
Instead, include:
- a slice of lake in the foreground
- the forest line or ruins in the background
This is how you get a “Ranthambore photo,” not a random tiger portrait.
Best shots here: tiger walking by water, tiger reflection, tiger + ruins composition.
Zone 4 Ranthambore Tiger Photography: Lakkarda, Adidaant + Malik Talab
Zone 4 gives narrow forest tracks, big banyan trees, and broken ruins. This creates dramatic light and shadow—and tigers sometimes walk close to the gypsy.
People ask:
“How do I frame a tiger in dense forest?”
Use the easiest framing rule that works in real safaris:
Rule of Thirds
- Place the tiger slightly left or right
- Leave empty space in front of its face
That empty space shows movement and makes the photo feel alive.
Zone 4 is excellent for close portraits because distance can be short—so you can capture:
- eyes
- whiskers
- face texture
- powerful walking shots
Best shots here: close face portraits, walking shots with leading space, light-and-shadow frames.
Zone 2 Ranthambore Tiger Photography: Nal Ghati, Sultanpur + Chamari
Zone 2 is known for rocky outcrops and strong natural viewpoints. Tigers sometimes rest on rocks and look down into the valley.
People ask:
“How do I make my tiger photo look powerful?”
Use a lower angle.
The Low-Angle Trick
When your gypsy stops:
- sit lower
- hold the camera around knee height
This makes the tiger look taller and more majestic. Rocks become a strong base, and the sky becomes a clean backdrop.
Zone 2 often gives dramatic frames with fewer distractions.
Best shots here: tiger on rocks, low-angle hero shots, clean-sky backgrounds.
📞 Book your Ranthambore safari: +91-9344813299
📧 Email: [email protected]
🌐 www.flyinghornbill.com
Light Direction Tips for Ranthambore Tiger Photography
Light changes the emotion of a photo. Ranthambore is open, so sunlight often reaches the tiger better than dense parks.
Use Golden Hour Light in Ranthambore Safari
Morning safari starts in softer light. It:
- reduces harsh shadows
- gives warm glow on fur
- keeps colors natural
“Why do my tiger photos look dull?”
Most dull photos happen when the sun is behind the tiger. You get silhouettes instead of detail.
Keep the Sun Behind You
When the sun is behind you, the light falls on the tiger and brings out fur texture.
If the sun is in front of you, adjust your angle. Even small shifts can change the shot completely.
Framing Techniques: How to Get “Wow” Ranthambore Tiger Photos
Ranthambore gives natural frames everywhere—use them.
Frame Tigers With Ruins, Water + Tree Roots
- Near Padam/Rajbagh: keep water in foreground for depth
- Near ruins: include a piece of wall for story
- Near banyan roots: use roots as natural borders
This creates a photo that feels like Ranthambore: a royal tiger in a royal forest.
Best Lens for Ranthambore Tiger Safari Photography
Most first-time photographers ask:
“Which lens should I bring to Ranthambore?”
Here are easy choices:
Purpose → Lens
- Close portraits → 70–200mm or 100–400mm
- Habitat shots (tiger + landscape) → 24–70mm
- Distant shots → 150–600mm
Simple Camera Settings to Start With
- Shutter speed: 1/800 or faster
- Aperture: f/4 – f/5.6
- ISO: Auto ISO (limit to 3200)
- Focus: always on the eyes
Why Ranthambore Gives More Photography Chances Than Many Other Parks
Ranthambore is more open than dense forests like Corbett. That means:
- longer visibility
- more time to compose
- easier focus
- more background choices (lakes, ruins, grasslands)
So if you want a higher chance of getting well-composed tiger photos, Ranthambore tiger photography is a strong starting point.
Where to Stay + What to Book (Easy, Practical Planning)
This is where most people lose time (and miss shots): they don’t plan logistics.
Best Areas to Stay in Ranthambore for Early Safaris
Look for stays near:
- Sawai Madhopur
- Safari gates / main access routes
Good stay styles (choose your comfort):
- Jungle resort in Ranthambore
- Family-friendly hotel in Sawai Madhopur
- Budget stays near Ranthambore safari gate
Best Experiences and Activities to Add
These add context to your photos and make the trip feel complete:
- Ranthambore tiger safari booking (gypsy/canter)
- Ranthambore Fort visit (history + views)
- Guided birdwatching tour in Ranthambore
- Local village experience near Sawai Madhopur
- Day trip wildlife safari (if you’re extending your India wildlife itinerary)
Final Thoughts: The Ranthambore Tiger Photography Formula
Ranthambore National Park gives both new and experienced photographers a perfect mix of landscape variety, clear visibility, and high tiger movement.
- Zone 3 gives lakes + reflections + ruins for story frames
- Zone 4 gives close forest paths for sharp portraits
- Zone 2 gives rocks + low angles for powerful compositions
When you understand light, use simple framing, and carry the right lens, every safari becomes a real chance to come back with memorable tiger photographs.
If you want our free PDF “Ranthambore Tiger Photography Shot List + Settings Cheatsheet”, comment “TIGER”or email [email protected].
📞 Book your Ranthambore safari: +91-9344813299
📧 Email: [email protected]
🌐 www.flyinghornbill.com
About Navaneeth Krishnan
Navaneeth Krishnan is a premier Travel Curation Expert with 14+ years of experience. Having partnered with top travel brands, he knows India’s tourist spots like the back of his hand, making him the trusted expert to design your next unforgettable, perfectly tailored tour.